Infrared Look using Photoshop’s Channel Mixer
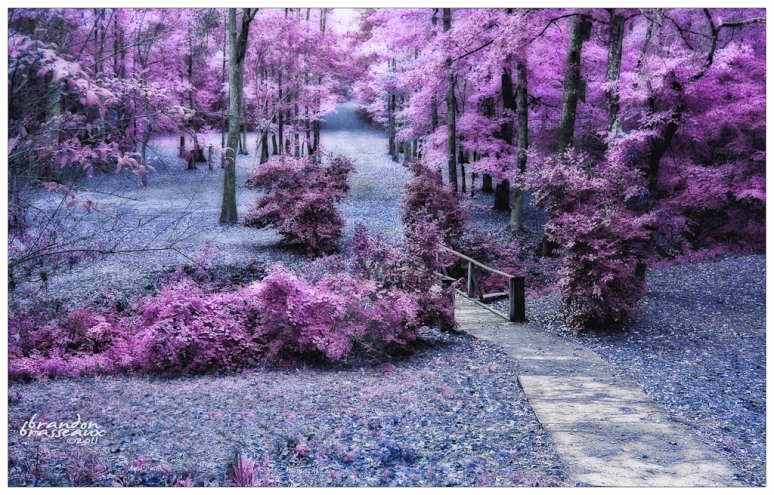
This tutorial is about using a Photoshop technique to bring out an “infrared” style in a photograph. If not familiar with the look, browse through this Flickr group. As you will see, there are many different styles within the style. This post is geared toward how I brought about the below photograph, but hopefully, through the tutorial you’ll notice that a plentitude of end results can stem from the same technique.
Software and Format Notes: Photoshop CS4 & Lightroom 3.3 used. Shot in RAW format, and then imported into Phostoshop from Lightroom, and then worked with in 16-bit RGB mode.
Selecting a Photograph
Any photograph can be used, but from my experience, simple color patterns work best to achieve the more phantasmal results. Here is my original. I selected this one as I knew that I would be able to get that purplish hue out of the green foliage when applying the technique. Another factor to consider is original exposure. Brighter exposures will lend themselves to more luminous tones. I brought up the exposure on the original up about 0.50 in Lightroom before sending it to Photoshop. Below is the original:
Processing in Photoshop
- There are only three panels needed: Channels, Layers & Adjustments. On the Layers panel, duplicate the original file. If any adjustments are needed to the image, now is the time. I framed a stump into the foreground in the original, but once I brought it into post, I decided it was too distracting so I cloned it out.
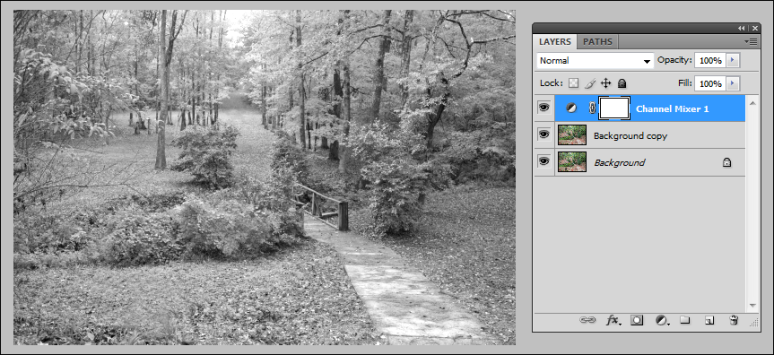
- Add a Channel Mixer adjustment layer. Next, select the Monochrome checkbox on the Channel Mixer panel.
With this adjustment layer you will bias one of the channels to achieve an infrared look in monochrome. By biasing, I mean that you will make one channel 100% and the other two will be set to 0%. For my sample, I was heavy on the red channel while pushing back the blues and greens, but this will depend on your native colors. The rule of thumb when tweaking the channel sliders is that all three should equal 100%. I find though for this technique, overextending the total can work. A chief reason for not going over 100% is that it can cause some noise/artifact issues. But for this style, imperfections aren’t all that bad. Bottom line is to tweak until you get the look that you want. You can always come back to the Channel Mixer layer and make adjustments. Below is how the source image looked with just the Channel Mixer applied.
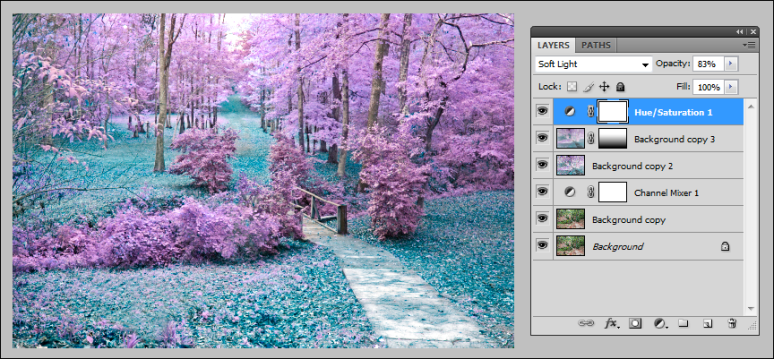
- Duplicate the color version of the source image, and then move it on top of the Channel Mixer layer. Next, invert the color by hitting CTRL + I. Set the blending mode to “Color.” At this junction, you should be able to see the stark colors.
- The next step is where I increased the glow. Duplicate the inverted layer, and then add a Gaussian Blur (Filter > Blur > Gaussian Blur). The amount of blur is relative to how much you want to soup up the glow. I used a blur of about 3.5 radius. Once done, click OK to close the Gaussian Blur dialog box, and then change the blending mode on that layer to Soft Light. If needed, drop the opacity on the layer to take some glow off. As a side note, I didn’t want a uniform glow so I added a layer mask to the layer. On the layer mask, I drug a black/white gradient from the bottom to top. This action masked the glow from the foreground and gradually let it through towards the foliage at the top of the image where I wanted the concentration of glow.
- Add a Hue/Saturation adjustment layer. This is where you can change the hues by moving the slider left to right or adjust the amount of saturation. Again, it’s all about what works best for your image.
- That’s it, the gist of the technique.
Conclusion
If you notice, my final I posted at the start looks a little bit more different than the last. This is because I decided in the end I wanted more blues instead of the cyans, and once I brought the file back into Lightroom, I used the colors panel to move the cyans to more blues. I also dropped the Clarity values to get more diffusion and hiked the Contrast slider. I mention this because the tutorial is chiefly about the core technique in Photoshop to get some of those infrared tones: channel mixer, inverted layers in color mode, Gaussian blur layer and the final hue/saturation layer. Once you have worked this initial process, you can then start moving the image into other creative directions.


Wow, this is really impressive. I love that first shot. I’m going to have to try this. Thanks so much for the wonderful post.
Thanks, Katie. Looking forward to see what you whip up ;). Cheers.
i find this easier to do in lightroom. There is an infrared preset, after which I just adjusted the different colours, hues, vibrancy and saturation on the appropriate sliders. I had to adjust the primary red blue and green sliders (right at the bottom under everything in the development section) too. Used the spot corrector with to apply random different exposures and thus that luminant effect. Used a very mild gradiated filter too, to increase the drama and darken the undersides of trees. My blue tones at the end were more like the ones in your last screenshot, however otherwise the effect is very very similar.
Well done Brandon – that seems pretty straightforward to try. I’ll have a go and maybe post the result on my blog this weekend.
Well explained and very informative. Thank you for this. I will definitely giving this technique a go!
Very nice! I’m trying to duplicate your method but it’s not working. I must be doing something wrong! 😦
Which part is not working? Not getting the tones?
It wouldn’t invert the colours. Maybe I’ve missed a step! 😛
Pingback: Fall Colors | Alex Frank Photography
Nice tutorial, I’ll definitely be giving this a shot in the near future! Thanks 🙂